Friday, September 16, 2011

Big Sail Today

I really pushed myself today, and had what I would consider a big sail day.  I was out for about six hours in 15 knot winds and pretty rough seas.  Ravat took a bit of a beating bashing through the waves, but of course performed flawlessly.

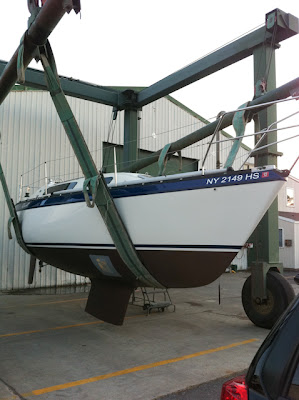
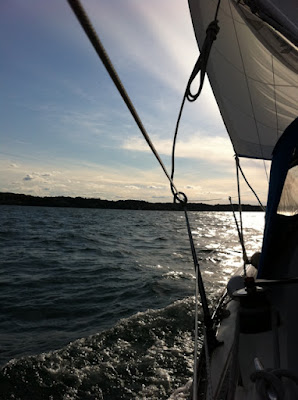
I really got to spend some time learning sail trim on different angles to the wind because I went in a bunch of different directions rather than my usual out and back.  

By the end of the trip the winds were building and gusting hard enough to heel me past 30 degrees.  I'm not really rigged for reefing the main, so I under-trimmed it to spill some extra air and spent most of the time close-hauled and a bit too far into the wind, again to minimize its effects on me.

Some lessons I learned today:
  • First time trying out a tether on my life jacket.  I really need to work on where to attach it for various activities.
  • I had a lot of trouble tacking the boat through the high winds and waves.  She always stalled out just shy of the half way point because the wind would blow the bow back.  At one point I gave up on tacking and jibed instead - that seemed to work better.
  • I had trouble tacking back to port.  It seemed that no matted how far past the pier I went on one tack, the return tack wold blow me just as far backwards as I came back in.  As the time was growing short, I finally gave in and motored back in.  I was pretty tired, and the winds were still building which was starting to make me uncomfortable.
  • I'm still in need of optimizing my take down of the main.  I still need to crawl up to the mast to do that as the slugs won't come down the track completely on their own.
While some of that may not sound great, it was really sailing right at the edge of my abilities and gave me a lot to think about.  There were a few times I was uncomfortable with a situation, but I never panicked, and I don't believe the boat was ever in danger.  I'm starting to get some confidence in bigger wind / waves but I have to say I prefer smaller waves.  The last two times out, if I stopped paying attention for a second I stood a good chance of being launched across the cockpit - that takes some getting used to.

The other thing that takes some getting used to is how the world keeps moving under my feet 4 hours after I docked the boat!  What's up with that?  (No, I have NOT been drinking wine this evening!).

Wednesday, September 7, 2011

Don't Let This Happen To You

If you have a boat, and it has a leak... FIX IT!  It's hard to describe how damaging a small leak can be over time to the interior of a boat.  It's pretty easy to describe how painful the repairs can be though.  They are time consuming, and expensive.  In this case, I am slowly reassembling Ravat's interior and replacing damaged panels as I go.  I am just about ready to re-install the cabin panels which butt up against the windows.  The port side has some minor water signs (streaks in the wood) but it's mostly solid.  The starboard side is a whole different story.
Water Damaged Starboard Cabin Liner

The picture above shows a very large section of the panel which completely delaminated and disintegrated.  As much as I wanted to bypass this kind of thing, there wasn't enough structure left to re-hang this panel.  Not even soaking in a few layers of Epoxy could save this one.  My first task was to slowly and carefully separate the headliner material from the old panel.  For the most part it came off without problems.  The delaminated area is going to be a headache for me though as the wood chunks don't want to let go.

I happened to have a nice sheet of 1/4" birch plywood in my shop which I cut to match this damaged piece.  I couldn't get it quite right on the first try because the template panel we so damaged it didn't hold its form well.  After a few test fits I came away with new marks to cut from.  I'm concerned that I may have wasted that sheet of plywood though.  This stuff is very high quality, and fairly stiff.  That makes it very difficult to conform to the contours of the cabin top.  I'm thinking that I should have picked up a sheet of cheap luan instead.  It's a bit more thin (which helps where the panel tucks in) and a lot more flexible.  At this point I think I'm going to finish getting the plywood template to fit, and then replace it with luan.

If all goes well, I'll get the Luan test fit, and then reapply the headliner material with 3M adhesive.  All this will go smoothly and I'll relax with a glass of wine having finished the project two hours ahead of schedule.  Riiiight.

The moral of the story is, fix those leaks immediately.  Your boat can hide a lot of damage before it becomes obvious.

Wednesday, August 17, 2011

Getting Back On Track

The Cockpit as a Work ShopThat fuel tank replacement threw me for a loop.  not only was it not "on the master plan", but it took longer than I'd expected.  Last night I was able to clean up the sawdust residue with the mini-shopvac and finish hooking up the tank, tightening hose clamps, etc.  I filled it back up, again running the fuel through the Baja Filter, and tested the engine.  She started right up without hesitation and ran flawlessly for about 30 minutes so I think I'm safe in terms of not having to bleed the lines again.

It may also be just a figment of my imagination, but it seems like the engine is running a bit more smooth after the oil change.  My entire life I've thought I could sense a change in the engine's noise right after a change though, so it might just be some kind of wishful thinking.

While the engine was running I spent a bit of time applying weatherstripping to the cockpit lockers.  I'm hoping this will reduce a bit of the vibration noise I get at certain RPMs.  Without the foam the lockers are not tight enough to pull their latches, so there is much rattling.  We'll see next time I get out for a motor up the channel.

The cockpit locker dividers are now all installed, which removes yet another big piece of cabin clutter.  It's still a complete disaster inside the boat, but I feel like I'm slowly making progress. 

Now that I'm back on track with putting things back together rather than repairing / replacing it's a good time to look at the short-term to-do list:

Wire the Sahara 1100 bilge pump
Wire the AC main panel and galvanic isolator
Install the battery charger AC circuit
Install the AC outlets circuit
Install the bow fresh water tank
Repair the delaminated plywood on the starboard window headliner panel.
Dremel work to integrate the new alcohol stove into the gimbal.
Select and purchase stereo head unit
Install aft cabin bulkhead panels, flush mounting VHF and stereo units in port coaming recess.
Secure bilge pump hoses - STOP the FLOP.
Of course there is much else to do, but this is what I'm focusing on in the immediate future.  Should keep me pretty busy in between sailing.

Monday, August 15, 2011

Fuel Tank Installation

It's amazing to me how many "gotchas" come up in a typical project.  Even when I'm confident, I still get knocked on my butt.  Case in point is the installation of my new fuel tank.  I had only a few weeks ago removed, cleaned, and reinstalled my original tank.  I was feeling pretty confident that the new one would go without a hitch since my experience was so fresh.  Nope.

The old tank ended up being a nightmare to remove.  I had to remove cockpit locker dividers, the new starter battery on the port side, and wrestle it through the new bilge pump hoses which I haven't fully secured yet.  Not only that, but for some reason it seemed that the filler hose had grown by about a half inch as I couldn't get it out without pulling the deck fill.  Ugh.  Re-bedding a butyl seam on that filler is no fun at all.

The mistake I made in selecting a new tank was only paying attention to the tank's overall dimensions, and not the fittings themselves.  As it turns out, one of the fuel pick-ups exists right where the tank mounts to the cockpit sole, requiring that I cut a notch to allow it clearance.  You gotta be kidding me!  

Of course, this meant that the mounting bolt for the strap also had less then ideal support below, so I needed to move the strap.  Is this an ideal situation?  Nope.  But given how short our sailing season are, it wasn't worth losing 2-3 weeks to have a custom tank made.  When this tank gets close to wearing out I'll go custom.  For now though, I'll go sailing.

The good news is that this tank (RDS Manufacturing) is solid as a rock, and it's ever-so-slightly smaller dimensions are a much better fit with the new larger seacocks for the cockpit drains.  I still need to do some fine tuning to the strap tension, but I'm very pleased with the tank itself.

Were I to do this over again I would purchase a custom tank from RDS based on the stock model I selected, and simply have the extra fitting left out.  I'd also have the vent fitting set up as a rear-facing elbow, but that's not as big a deal.

I still need to get the engine controls hooked back up, and clean up the mess I made during installation.  Then I can reinstall the starter battery and locker dividers.  This will be nice as the battery and dividers are taking up a TON of cabin space right now.  Not to mention that it will be nice to have the boat usable again.  With the dividers back in place I may be able to start storing some things in them, which will free up even MORE cabin space.  Sounds nice to me!

And for the grand finale, here's the tank installed in all its shiny glory:

Friday, August 12, 2011

Busy Weekend Coming Up

The last few days have been pretty exciting aboard Ravat, and the next two are likely to be as well.  I took delivery of the new interior cushions on Thursday, and they look unbelievable.  I've also been busy reinstalling interior panels in areas I'm not still pulling wires.  That makes a big difference as well.

My new aluminum fuel tank was delivered by UPS a short time ago, and it' everything I hoped it would be.  Slightly smaller, far more rigid, and most importantly, (I hope) it doesn't leak.  This will be a high priority installation to be certain.

Another project I'm excited about is the new Harken Outboard Furling Blocks which I have installed, but not yet run the line through.  I constantly trip on the furling blocks along my narrow side decks, so this one should not only reduce friction and look very cool, but it will actually be a bit of a safety gain as well.  Now watch, my furling line will be about 6" too short for the new lead.  That would be a classic situation.

I'm on the cusp of installing the VHF radio as well.  The antenna wire is in place, and just needs to be terminated.  I'm anxious to test it and verify that the antenna connectors I terminated are working as expected.  Then I can seal them up tight with the shrink tubes to make things a bit more permanent.

If I'm really ambitious I'd like to get the turnbuckles lubricated with some Tef-Gel before I tune the rig.  But most of all, I'm really looking forward to SAILING now that the week has ended.  Yeeha!

Monday, August 8, 2011

Don't Forget to Check for Cooling Water!

My boat was in the maintenance slip a few days last week for some stress crack repairs which exceeded my skill levels.  The yard did a great job on the fiberglass and gelcoat work, but they did not do a very good job in transporting my boat between slips.  They have a habit of leaving my seacock open when they move it, which I consider unsafe.

I closed the seacock while I was working once night, and it seems they didn't bother to open it when they brought the boat back to my slip.  Some of my dock friends noticed no water was coming out, and yelled to the guy driving, but by that point it was really too late.  The next two times I have started the engine it has been putting some pretty nasty black stuff into the water.  Not oil sheen, more like black dust in the water.

I started the engine again before I left last night, and the flow was almost normal.  I'm hoping that what I'm seeing is impellor residue working its way out of the engine.  I have ordered a bunch of replacement engine parts to keep on hand (belts, impellors, etc.) so I will do a proactive replacement when that order arrives.  In the mean time, the impellor is still moving water effectively and without any visible change in exhaust burping.

Ugh, it really irritates me when someone doesn't take the same care of my boat that I do.  Well, at least to such a significant degree...

Friday, July 29, 2011

FINALLY!

Yes, that's MY boat.  And no, I do NOT miss the cradle one bit.
Splashed!  Ravat is back in the water.
Time to unload the tools and do some sailing!  This season is short and I have a lot of time to make up for.  I'm planning to make good use of what's left.

Starting tomorrow I'm putting the sails back on and reinstalling the cabin panels.  She'll be complete again very soon.

Tuesday, July 26, 2011

Fighting to Launch

I'm trying hard to get Ravat in the water.  This morning The Yard was working on grinding and barrier coating the bottom of my keel since its in the sling, and this chunk fell off.  Nice.

I think the stress which caused this crack came from my under-sized cradle which was bowing significantly from the weight of my boat.  So, they are fixing it, along with the other items on the to-do list.  Seems like just when I think the ghosts of the prior owner are excersized, something like this comes out.

In all honesty, there's not many examples in history of someone filling the Black Box the way I've been doing it for the past two years.  I have fixed more problems at the expense of my short sailing seasons than most sane people would tackle.  Is it possible that the Black Box carries deficits between owners?  I hope not since there's no way to get a balance statement.

At this point we are scheduled to be in the water on Thursday, but there's a lot of things that could happen between now and then, so we're still looking at a possibility of some time on Friday as well.  Before that happens, I need to get some things done...

  • Install galley sink drain through-hull and seacock.
  • Install hoses on all seacocks.
  • Put transient dock lines in place for handling during launch.
  • Put permanent dock lines in my slip.
  • Bring life jackets, fenders, and boat hook out.
  • Pick up hand-help VHF to suffice until I can finish wiring the new one in the cabin.
  • Hook up the new electronic bilge pump hose to its shiny new through hull, and secure it along its length.
  • Put boom in the cabin for installation later this week.
I'm most concerned about the timing on the through hull install as I'll need to barrier coat the faired bolt holes when done, and that means epoxy drying for its required period.  Those required periods rarely align with my free time when I'm in a time crunch.

Never a dull moment, but the light at the end of the tunnel is growing brighter.  She's out of the cradle and into the sling.  That's a one way street to the slip as far as I'm concerned.

Monday, July 18, 2011

First Oil Change

This post is a little out of order chronologically, but better late than never.  I hadn't been too worried about oil changes given the extremely low volume of engine hours I tend to create.  I only sailed the boat around ten times (or less!) when I bought it.  I'm not sure of when the oil was changed prior to those first sails.  The boat then sat in a cradle being refit for nearly two years, and here we are.  Certainly not enough use to demand a change, although I don't know how much oil breaks down over time either.  For that matter, I don't know that the correct type / grade of oil was used.  It was high time that I removed this variable.

I picked up a West Marine Manual Oil Changer, which is essentially a vacuum pump, a long thin dipstick hose, and a reservoir.  It's built very well, and made the oil change a breeze.  It's so easy in fact that I'll never hesitate to crank out a change again.  I've posted a review of this pump in this web site's Tools Resources as I was so impressed with its simplicity and functionality.

It feels good to finally begin to understand the diesel.  Between bleeding the lines, replacing belts, and this oil change it's starting to feel a lot less mysterious to me.  These small procedures have also given me more chances to wipe the engine off, and continue making it cleaner.

Thursday, June 30, 2011

Building a Custom NavPod Instrument Housing?


I've been going back and forth in my mind on the decision of how to present my chart plotter and auto pilot control head.  My first strategy was to mount the AP on a NavPod rail mount off the side of my pedestal guard, and then attach the plotter... Somehow...  That plan was trashed when I saw that the NavPod for an ST-60 size instrument was the size of 3 or 4 stacked instruments.  I hate clutter, and I don't want my housings any bigger than absolutely necessary.


The second plan was to use a NavPod to house both the plotter and the AP.  After staring at dimensions for a few hours I came up with one model that sort of had the right height and width, although not as proportional as I'd like.  Unfortunately, these things have way more depth than necessary, and again, would look pretty huge at my boat's helm.  On a big boat none of this matters.  In a tight cockpit, everything matters.

The biggest observation that soured me on the NavPod is the cost.  It's nearly $400 for the plastic box that fits my instruments.  I've laid up quite a bit of fiberglass, and I really have trouble understanding how these devices need to cost $400 with modern assembly techniques.  Yet another example of the Marine tax I suppose.  While I can still make that work into the refit budget, it feels like throwing money away.

My current line of thinking is to put together a custom box built from 1/4" high end plywood.  Pretty much all plywood these days uses waterproof glue, and the high end stuff I have left over from a previous project is very straight.  I'll then put somewhere between 1 and 3 layers of fiberglass cloth over it for strength and weatherproofing.  I believe that just 2 layers of epoxy would do the trick, so I'll probably be closer to 1 layer of cloth.

Rather than using epoxy fillets inside, I will use square strips at either 1/2" or 3/4" depending on what scrap wood I leverage from my pile.  These will be epoxied in place, and then filleted at top and bottom edges.  The purpose of these strips will be to add material to the corners to allow me to use a good round-over bit all the way around the box.  That's important not only for fiberglass layering, but also for safety.  The entire inside will be "painted" with two coats of un-thickened epoxy for water proofing and durability.  I doubt I'll bother with fiberglass on the inside.

The box will attach to the pedestal guard either with U-bolts or #10 screws and acorn nuts.  I haven't decided which way I want to go yet.  The last detail is how I'll allow the box to open and close for wiring access and seasonal removal.  I'm thinking about a access plate in the bottom approximately 4" square.  That should allow access to the internals with minimal impact on the box's overall strength.

I'll fair the outside with Microlight, then either spray it with a nice Krylon white enamel, or use Brightsides rolled and tipped.  Again, not sure which one I'll use yet, but I think either will look great.

What will all this cost?  I already have all the wood I need, so that part is free.  I expect I'll need about $30 in epoxy and another $10 to $20 in cloth.  So, do I choose $400 and a so-so fit with my needs, or do I chooses $50 and a prefect fit?  I think you already know which way I'm leaning.


Bilge Pump Plans Coming Together

I'm slowly working through the design for the new bilge pumping system on Ravat.  There's a lot I would like to do, but with time and budget being constraints I need to focus on what's important.  Since the boat should be relatively dry these days given the new windows, hatch, hull-deck joint, and freshly rebedded deck hardware, I am thinking that my de-watering needs are significantly reduced.  Yes, the stuffing box will continue to drip, but I'm hoping that once it has been repacked with Gore stuffing it will be of little consequence.

As it stands today the plan is to have two pumps on board.  One is the original Henderson MK-IV manual pump.  I've removed the Y valve, and will replace all of its hose with Trident XHD bilge hose.  This pump will continue to use its original through-hull.  Instead of pumping both bilges, I will leave a single hose in the engine sump and possibly add a weighted strum box.  This pump will only be used in emergencies.


The second pump will be a (moderately) high capacity pump that is essentially the biggest pump I can fit into the shallow and narrow bilge of my CS27.  That happens to be the forward keel bilge, which extends the hose by a few feet.  It's also not technically the lowest point in the bilge, but it's within an inch or less.  Since I'll need 2-3 inches of water to make this pump kick off, that's not an issue anyway.  I'm 99% certain that the pump will be an Attwood Sahara 1100.  I can't fit any of the 1500+ GPH pumps into my bilge, unfortunately, so 1100 GPH is about as big as I can go.

De-watering will continue for the short term to be manual pumping and sponge work. I never really found it oppressive when the boat was leaking all over, so I'm sure it won't be bad now that the boat is pretty dry.

This pump will be connected to the house bank positive bus, so will be available even when the boat's switch is off.  I'm planning to use a Blue Sea bilge pump switch as I've been very impressed with everything else they make.  I also like that it's more narrow than the popular Rule switch which is also a great choice.

I'm still hashing out the best place to mount the switch.  My companionway surface is just about full now that I've mounted the Victron battery monitor and the new fuel gauge.  I have a few places in mind, but I anticipate needing some head-scratching time before I'm ready to make any new cuts.

Sunday, June 26, 2011

Electrical Day

And so it begins!  I'm now focusing on the core electronics and trying to get the critical components in place to let me turn over the engine.  The start of that journey was a concerted effort to get rid of all non-essential or inappropriate wires.  That ended up being a fair amount of lamp cord, a ton of non-tinned wire with brittle housing, and some unidentified sections.

One of the disturbing finds was this piece of wire, which obviously had a lackluster termination.  Moreover, it is suffering from severe corrosion, and was paper thin as well as a completely wrong size terminal.  This was one of the battery terminals, and yet another potential fire hazard.  I'm happy to say this wire it now in the garbage where it belongs, and a spool of ABYC compliant wire is en-route to me for replacement.

All of my boat's main DC backbone was 8 gauge non-tinned wire.  There are no heat shrinks, no double-crimped terminals...  Heck, they weren't even stripped to the right length as you can see in the picture.  I mean, every wire; Not just this one.


I had another great find while tracing one of my unidentified wires.  A poor quality butt splice had teed a connection for a 12V accessory plug into one of the cabin lighting circuits.  I traced this to the 12V socket, and decided to take the wires out to look at them more closely.  After removing the loosely wrapped electrical tape I discovered that a previous owner had decided that quick connectors are a bit too much effort to install.

Instead, they twisted the stripped end and looped it through the male connector.  Heck, it was tied in a knot so it ought to hold, right?  Wow.  Yet another fire waiting to happen, and this one was about about 16" from the fuel filter.  I won't even go into the use of non-tinned wire again.

Having exercised those demons I moved on to installing the new furniture.  I now have all batteries in place, which felt good.  I then mounted a new bus bar over the house bank to use as a positive aggregation point.  I then mounted the new raw water strainer as a place holder.


Next up was the Blue Seas ACR, which is placed directly behind the main DC panel.  I don't expect to need access to this device very often, so I put it where the sun doesn't shine.  And finally, right below the ACR I mounted the two auxiliary fuse blocks which will feed instruments and accessories.

I also managed to mount the final spinnaker pole bracket on deck.  I'd needed to leave it last trip out while the deck holes were drying from being potted.  That's the last of the deck hardware for now, so yet another piece of gear no longer cluttering the cabin.

Saturday, June 25, 2011

Digging the New Drains

Aah, look at those beefy new Groco flange adapters and in-line ball valves mated to 90 degree tailpieces.  The carefully selected ShieldsFlex II exhaust hose makes the bends gracefully while keeping the hull's integrity.  And yes, those are shiny new double-clamped all 316 stainless bands!  Did I mention the 1/2" structural FRP backing plates?  Oh yes, this is one HECK of a through hull configuration, and my boat is glowing with pride.


Fitting all that stuff into the tight working space of the CS27 locker is not a small feat.  The starboard valve handle can't move 1/4" in any other direction without causing a problem.  This was less of an issue with the old gate valves since they didn't need to swing, but these things are worth the congestion.  They are beefy enough to be on the space shuttle.  I'm going to cut a section from old hose to use as chafe protection, but it's not too bad so I'm not in a hurry.

Adding a Cranking Battery

I decided that given my intended power budget for Ravat, a dual house bank would be more appropriate than switching between battery #1 an #2.  Of course, this left me with the challenge of putting an additional big heavy battery somewhere.  But where?

First of all, it had to be on the opposite side of the boat to help offset the weight of the house bank a bit.  That reduced the problem by 50%.  It also needed to be near the engine so that I wouldn't need excessively large cables.  That narrowed the problem even farther and left me with the starboard cockpit locker.  The next problem is how to mount a flat battery against a curved hull.

This turned out to be relatively easy with a little rough woodworking.  I squared the tray to the cockpit locker divider and bulkhead.  To get the hull profile I put in a piece of cardboard and scribed a line on it.  After a little cutting I had a perfect template to cut from wood.  The tray would mount on the bulkhead via cleat, and be supported aft by the profile.  In the end it looks like this:


The black footmans loops are for the nylon webbing which retains the battery box.  I chose a West Marine SeaVolt flooded multi-purpose battery in a group 27 form factor.  It has about 3x the cranking amps my boat requires, which will be good in the fall when it gets colder.  That will go in tomorrow so I can start approximating the wire lengths.

I'm planning to get my cables from GenuineDealz.com as they only charge $1 per crimp.  That's a lot cheaper than buying a quality battery crimping tool, even with the number of crimps I'll be doing.

Sunday, June 12, 2011

Fuel Fill Frustration

I knew I would need to remove the original fuel fill from the cockpit sole as it was leaking.  This was largely due to the loose screws rather than the sealant or the fill itself, but either way I had resigned myself to its removal.  When it came out I was not pleased with what I saw; It was a plastic fitting inserted into a metal fitting.  Probably original, but I'm not a big fan of those plastic fittings, especially knowing they have been in place for 34 years.  Cracking means either admitting water to the fuel tank (ruins engine) or admitting fuel vapors to the cabin (ruins the ambiance).

With this in mind, I picked up a new deck fill, thinking they would be similar in dimensions since both took a 1-1/2" hose.  Wrong again.  The diameter was approximately 1/4" smaller on the new fitting, although the mushroom head diameter was close enough.

My solution was to pug the under-side of the cockpit sole with masking tape and fill the entire hole with colloidal silica thickened epoxy, then re-drill the narrower hole.  This would also properly pot the hole and seal off the cockpit sole core.

Unfortunately, not only was it a warm day, but I also had only fast hardener with me.  I managed to cook off two attempts at filling the hole before getting it right.  This not only wasted expensive epoxy, but also precious time.  I left that night with the hole filled, but just barely.

The next day I returned to sand the repair flush, and re-drill the hole.  This was fairly uneventful, luckily.  In the end, I decided that the old screw holes which had been filled looked pretty bad, and so I gel-coated the entire repair area.  This is good in that I'm doing quality work which will protect the fiberglass.  This is also bad in that it means I had to wait for the gel coat to dry, which exceeded my work window for this evening.  When I left, the gelcoat was still a bit tacky.  I should be able to get it sanded tomorrow and ready for the deck fill installation.

The tricky thing that comes next is trying to figure out how long the deck fill barb can be without colliding with the tank's barb.  The fill hose is only about 3" long, so I'm pretty sure I'll need to use my Dremel wheel to trim the deck fill down to size.  That won't be hard, but it will take time.  I don't think I'll be able to get the tank in tomorrow, but I'll be close.

I'd hoped to wrap up the tank this weekend, but now it looks like middle of next week instead.  As always, my optimism is rarely in alignment with reality.

Almost Water-Tight

With the exception of the galley sink drain (which is trapped under a cradle pad, unfortunately) and the cockpit drains I have all the through-hulls and seacocks installed and nicely bedded.

It took a little messing about to figure out how to line everything up.  A bit more challenging than I anticipated.  But in the end, I think the positioning will work well.

I need to get the fuel tank re-installed before mounting up the cockpit drain seacocks just because I like having the extra room to work in that tight space.

Once all the seacocks are installed I will go back through and fair them with 3m Premium Filler.  When all is smooth and shiny I'll hit them up with barrier coating, and cover the new fairing block at the same time.

When all the barrier coating is done and blended, I'll lightly sand the entire bottom to prepare it for two coats of VC-17 blue.  That will complete all the hull work, and Ravat will once again be water-tight.

That'll be a big milestone!


All Hail the Footman Loop


The good news is that after I spent a little time looking at the tank mounting straps and their adjustment bracket I was able to figure out how they were supposed to be rigged.  They were not rigged that way when I took the tank off, which is why I had concerns about their integrity.  Now that they are rigged properly they seem rock solid and I'm happy with them.  Sort of...

As I was tightening the forward strap around my empty fuel tank I noticed that the mounting tri-ring was separating.  I can only imagine what almost 100 lbs. of diesel sloshing in heavy seas might do to further open it, and eventually drop the tank, spilling diesel all over the bilge.  Not exactly what I had in mind after super-sanitizing the bilges.

The first thing that struck me about these hooks is that they really don't seem appropriate to their job.  What exactly is the purpose of the inverted hook?  There isn't one, because it's not right.  I believe these are from some kind of  cargo rig, and not intended for attaching to a bolt.  So, I began a quest to figure out what I should be using.

After quite a bit of digging around the Internet I discovered footman loops.  They mount with two #10 through bolts, and are made from stainless steel.


Tomorrow I will drill new holes for the footman loop through-bolts and fender washers, then mount the straps in a more proper way which isn't susceptible to separation.  That should wrap up my fuel tank refurbishing, as I was able to successfully install the new fuel fill hose.  That was an interesting form of mind twisting chicken and egg puzzle, but in the end I triumphed.

In parallel with all this I have been finishing up the new cockpit locker dividers.  I built the forward dividers from 1/2" exterior plywood, and the aft pair from 1/4" plywood.  I then saturated them in un-thickened epoxy, and finished up by laminating one layer of 10 oz. cloth on each side to protect against dings, stiffen, and make them more durable.  The sound proofing is heavy, and I wanted them to be stiff enough to support it well, and have a tough skin for adhesion.

As I'm typing, the first coat of paint is drying on them.  I believe I'll end up putting about 3-4 coats on them as I was a bit sloppy with the fairing.  They are, after all, only locker dividers.  I rolled on an exterior mildew resistant white alkyd enamel by Behr (Premium Plus Ultra) which looks fantastic and smells evil.  It must be good...  I'm using it here first to make sure I trust it for the lockers themselves and the bulkhead which is also slated for painting.

The final touch will be adding sound proofing tiles to the dividers and the companionway stairs, but I imagine that will come after I launch the boat as time is running out.

A Fine Looking Cockpit


I'm a bit late in posting this, but the cockpit is looking very nice these days.  The aftmost locker doors have been reinstalled after being re-cored.  The new angle guard for the pedestal has been installed, as well as the new compass.  The pedestal is looking particularly sharp after its compounding, polishing, and wax.  Brought the darn thing back to a new look.

I also have the auto-pilot ring mounted on the wheel, and as you can see, the wheel is on the boat too.  I was going to keep it at home for a while so I could work on the leather wrap, but wanted to start getting stuff out of the house.  I can put the wrap in place some day when the boat is in the water and I'm waiting for my freshly brewed coffee to cool down.  Aaaah, that will be a good day indeed.

Below is another view of the new pedestal.  The angle guard takes up a bit more room, but is extremely functional in a way I didn't anticipate.  It's actually almost impossible to get in and out of the helm position without climbing over the seats.  But now, the position of the taller and forward angle guard is very convenient to grab onto.  I like it.

The next cockpit enhancement will be a NavPod housing for the Raymarine A70 chart plotter and the Autopilot control head.  I feel that both of these devices belong at the pedestal, although I'm not crazy about the busy look of the housing.  Functionality is a trump card in this case.

Thursday, June 9, 2011

Fuel Tank Frenzy

Today was a good day.  I managed to get all of the through hulls installed except for the cockpit drains.  I left the drains because I want to get the fuel tank back in place before adding things to get in my way.  And that is where our story begins...


I had removed the tank a few days ago with a few sub projects in mind.  First, it was covered in grime, and I wanted to clean it.  Second, the fuel fill hose was cracked, and needed replacing.  Third, I desperately wanted to get a fuel gauge installed somewhere I can read it.


The cracked fill was noted on a survey, and is probably responsible for the water in the tank that lead to algea growth, not to mention the diesel smell that wafts about the cabin.  In looking at it, it really seems that the best way to replace it is to drop the tank.  This was my primary motivation for yanking the tank.

Cleaning the tank was pretty easy.  A little Dawn and some scrubbing make short work of the grime.  The tank still looks pretty rough, but it's clean.  The next step was a poor-man's fuel polishing.

I picked up a West Marine baja filter which Practical Sailor rated #1 in their  November 2002 issue.  It is designed to filter out suspended particles of a certain size, and prevent water from going through.  After draining all remaining fuel from the tank, I poured about a half-gallon of clean fuel from a jerry can into the tank and proceeded to slosh it like a storm at sea for about a minute.

After my back returned to less than agony, and the burning in my arms went down to a smoulder, I poured the tank into the baja filter a little bit at a time.  The first few passes clogged the filter within seconds, requiring that i rub the screens to keep them clear.

I repeated the above process about five times until the stuff coming out of the tank went cleanly through the filter.  This made a huge difference in the tank's cleanliness, and made a huge boost in my confidence that the engine won't quit some time when I'm stuck in nasty seas.

Having cleaned the tank, I was on to my third mission:  A new gauge.  I really don't much care what brand, but I wanted a white dial as it seems sailboat-ish.  The local West Marine store had a Moeller universal kit in stock which fits all tanks from 4" to 27" deep.  Mine was just under 8", so I fit the specifications.

This job really couldn't be much easier.  I removed the screws from the old mechanical sending unit, and lightly pried it up with a sharpened putty knife to get under the gasket.  It popped right out.

I followed the Moeller instructions carefully and was able to get the new unit installed in about an hour.  I could do it much faster now, but there were a few moments of head scratching due to what I'll call "fuzzy" instructions.

The only complaint I have is that this unit does not come with a wiring diagram.  I'm sure they assume most people are just replacing existing ones and can transfer wires.  I'm not doing that, so I need to know what goes where.  I've found a bunch of resources which explain it, and it's pretty simple so I'm not worried about it.  Still, if you buy something electrical it ought to come with a diagram.

So now the clean tank with a new sending unit is ready to install.  Tomorrow I'll plan out the wire run and gauge mounting position, and pick up the supplies I need.  I should be able to get the tank installed over the weekend.

Mission accomplished!

Cockpit Drain Fittings Repaired... Cheap!

I couldn't possibly be happier.  I found two brass fittings at Lowes which are a perfect replacement.  They cost about $8 each.  You can't even have a dream about a marine product for less than $100, so this is good.

What I'm really pleased with is that they carried a 17 gauge model which appears to be nearly double the wall thickness of the original CS pieces.  Thses things feel like you could hammer tent stakes with them.

Took about 5 minutes to install them.  Project DONE.

Tuesday, June 7, 2011

Cockpit Drain Fittings are Cracked

You have GOT to be kidding me!  How many more surprises do I need to get through before I can just start finishing this refit and not add new work to the list?  I am very confident that the cracking is the result of winter ice backing up in the drains.  There's no corrosion to weaken the metal, so that seems like a reasonable assumption.

After a little research on the CS Owners Association I learned that these are bar sink fittings.  They really aren't very beefy at all, but then again they held up fine for 34 years so who am I to question?

Before I go any further, let me express that which I do NOT wish to do:  I do NOT wish to remove the cockpit drains and get stuck with fiberglass work trying to flush mount a new fitting that isn't quite the same as what I have now.  The last thing I need right now is another fiberglass job.

I'm hoping that I can find a new tail piece at Lowes or Home Depot that will do the job.  There, I said it!  The other option is to spend $200 per scupper for Perko fittings, or to buy reasonably priced Marelon fittings which will no doubt require finicky fiberglass work.  The Marelon fittings are probably one of the better compromise solutions, but they could set me back two weeks by the time I get them installed.

Yes, I know that what I get at Home Depot isn't going to be pure bronze.  Since I only sail in fresh water, that's not so big a problem as it might sound.  I'd actually love to find a replacement bronze fitting for this one, but I'm not optimistic given the vintage.  Let's review an already mentioned detail which bears relevance:  This sink fitting has been on my boat for 34 years and has been fine.

Researching these replacement parts tends to take as much time as the fiberglass tweaking that comes after!  There's just no way to efficiently or economically refit a 30+ year old boat.  You can do it cheaper than the Yard can, and often you can do it better.  But you can't very likely predict how long it will take or how much it will cost.  You just have to resign yourself to saying, "It is what it is!" and keep putting one foot in front of the other.